Interface Programming 1
An Introduction and Course Overview
The predominant underlying markup technology behind the web is HTML (Hypertext Markup Language). Together with CSS (Cascading Style Sheets) and JavaScript, HTML web sites can be powerful, flexible, usable, accessible, and beautiful.
In this class we will learn the basics of HTML, CSS, and Javascript catered toward visual web designers who need to be able to convert visually creative designs into interactive working web sites. During the first few weeks of the semester we will learn the basics of markup (HTML), styling (CSS), and scripting (JavaScript). During the remaining weeks of the semester, we take an existing design from Photoshop and use it to go through the final stages of the design process for interface design of building and testing a HTML web site.
Course Structure
Coding 3 Sites in One Semester.
The structure of the course consists of coding three sites: Site #1 (a WEEK-BY-WEEK, step-by-step introduction-level "Company Name" site, Site #2 (a MIDTERM intermediate-level, independently coded "Company Name" site, and Site #3 (a FINAL custom designed and fully coded site). The final project is due during the last week of the semester.
-
PHASE 1:
Site #1 [WEEK-BY-WEEK]Step-by-Step CodingPHASE 2:
Site #2 [MIDTERM]Independent CodingPHASE 3:
Site #3 [FINAL]Coding Your Own Site.1 2 3 4 5 6 7 8 9 10 11 12 13 14 15 16 17
500 Point Grading System
Your course grade is based upon a total of 500 Points.
There are basically three deliverables for this course: Site #1 (200 points), Site #2 (100 points), and Site #3 (100 points). Site #1 consists of 8 individual "Steps" work 25 points each.
Class participation (100 Points) is graded based upon how much you participate a) during formal critiques and b) online via Laulima. There are two formal critiques: a midterm critique and the final critique.
-
PHASE 1: SITE #1 [WEEK-BY-WEEK] - (200 Points) Weekly Step-by-step Coding of "Company Name" Site #1:40%1 2 3 4 5 6 7 8 9 10 11 12 13 14 15 16 17200 Pts
-
PHASE 2: SITE #2 [MIDTERM] - (100 Points) Independent Coding "Company Name" Site #2:20%Site #2100 Pts1 2 3 4 5 6 7 8 9 10 11 12 13 14 15 16 17100 Pts
-
PHASE 3: SITE #3 [FINAL PROJECT] - (100 Points) Coding Your Own Custom Designed Site (Site #3):20%Site #3100 Pts1 2 3 4 5 6 7 8 9 10 11 12 13 14 15 16 17100 Pts
-
CLASS PARTICIPATION - (100 Points) Online Discussions via Laulima & In-class Critiques:20%LaulimaVariable PointsCrit~50 ptsLaulimaVariable PointsCrit~50 pts1 2 3 4 5 6 7 8 9 10 11 12 13 14 15 16 17100 Pts
Major Assignments
Overview of the Major Projects for this Course.
| Assignment: | Week: | 1 | 2 | 3 | 4 | 5 | 6 | 7 | 8 | 9 | 10 | 11 | 12 | 13 | 14 | 15 | 16 | 17 | Due: |
|---|---|---|---|---|---|---|---|---|---|---|---|---|---|---|---|---|---|---|---|
| 1. HTML Page | Week 2 | ||||||||||||||||||
| 2. HTML + CSS | Week 3 | ||||||||||||||||||
| 3. Base + Sections | Week 4 | ||||||||||||||||||
| 4. Images | Week 5 | ||||||||||||||||||
| 5. List Navs | Week 6 | ||||||||||||||||||
| 6. Columns | Week 7 | ||||||||||||||||||
| 7. Sprites | Week 7 | ||||||||||||||||||
| 8. Completed Site | Week 8 | ||||||||||||||||||
| 9. Midterm project | Week 11 | ||||||||||||||||||
| 10. Final Project | Week 17 |
Calendar
A monthly overview of the semester
Course Content
A Week-by-Week Breakdown including all links, lessons, assignment details, etc.
1 Intro to the Course Expand/Collapse
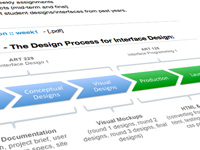
Week 1: This week we will go over the course and the major assignments and deliverables. Lessons include an intro to HTML, Dreamweaver, and how to setup a local folder system and development environment.
Agenda:
- Introduction to the course
- In this class we will go through in detail the late phases of the design process of planning and designing web sites.
- Game plan for the semester
- Overview of the syllabus
- Weekly and bi-weekly assignments
- Three major projects/sites (week-by-week intro site, mid-term, and final)
- We will take a look at student designs/interfaces from past years.
- Set up Local Development Environment and Class Web Page
- Local Folder Setup
- Dreamweaver
- FTP & Filezilla Setup
- Intro to HTML (Markup) and Assignment #1: A Simple HTML Web Page
Presentation:
- Video Lesson :: Intro to the Course - [url]
Video Download: MP4
- slide presentation :: week1 - [.pdf]
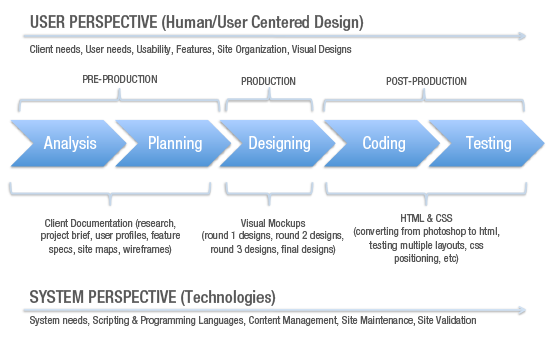
Class Overview - The Design Process for Interface Design:
Class examples + related links:
Learning HTML & CSS - Resources:
- reading assignment :: w3school's html tutorial - [url]
- reading assignment :: w3school's html5 tutorial - [url]
- reading assignment :: w3school's css tutorial - [url]
The Power of CSS:
Class-related Links:
- exercise example :: john doe's local folder structure - [.zip]
- exercise example :: john doe's old art 128 page - [url]
- exercise example :: john doe's 1st assignment - [url]
Some Hosting Options:
- in-class example :: Bluehost (3rd Party Hosting Provider) - [url]
- in-class example :: iPage (3rd Party Hosting Provider) - [url]
- in-class example :: Super Green Hosting (3rd Party Hosting Provider) - [url]
- in-class example :: GoDaddy (3rd Party Hosting Provider) - [url]
Other Related Resources:
- resource :: adobe tv - [url]
Lessons:
- Video
Lesson :: Local Folder Setup - [url]
Video Download: MP4
- Video
Lesson :: Dreamweaver Setup - [url]
Video Download: MP4
- Video Lesson :: FTP
& Filezilla - [url]
Video Download: MP4
HTML Coding: Common HTML Tags:
<!DOCTYPE html>
<html>
<head>
    <meta charset="UTF-8" />
    <title></title>
</head>
<body>
    <h1></h1>
    <h2></h2>
    <h3></h3>
    <p></p>
    <ul>
        <li></li>
    </ul>
    <ol>
        <li></li>
    </ol>
    <a href="#"></a>
</body>
</html>
Assignment: Simple HTML Web PageDue: Week 2
- Video Lesson
:: Simple HTML Web Page (assignment #1) - [url]
Video Download: MP4
- assignment #1 :: simple HTML web page - [url]
Assignment: Get Set UpDue: Week 2
- Set up a local folder system where you will work and test your site locally.
- Set up your class web page. Please note that all students are required to have hosting space to post their designs, assignments, and ultimately their final web site. Students are required to purchase a hosting plan with a third party hosting provider. Past students have purchased hosting plans from Bluehost, iPage, Super Green Hosting, and GoDaddy (these are just a few of many hosting providers available). Plans should include ample disk space (ie. more than 2GB or unlimited), support for CGI, PHP, and MySQL, multiple domain hosting (to host more than one site), one-click install/support for Wordpress, Joomla, and Drupal (popular CMS options), and a low, competitive price (an example rate is around $3-$5/month – this is subject to change based upon current trends for hosting prices).
- Once your class web page is set up, email the url to the instructor.
- Post your 1st assignment - simple HTML web page - on your class web page.
- Complete the tutorials (links are below) on w3schools.com.
2 HTML & CSS Expand/Collapse
Week 2: We will continue on where we left off from last week - setting up our class web pages - then learn how to link a CSS style sheet to an HTML document.
Agenda:
- Introduction to CSS
- Linking an HTML page to a Style Sheet
- The Web Developer Toolbar, Firebug, & Google Chrome's in-browser developer tools
- Time permitting tests & other lessons:
- Base (Version #1) HTML+CSS setup with em-based typography
Two ways to insert an image into an HTML page (img tag vs. css background property)We may go ahead to next week's lessons.
Class examples + related links:
Inspiration:
Assignment related:
- in-class example :: html page with a linked style sheet - [url]
- in-class exercise :: linked style sheet - [.css]
Helpful Debugging Resources:
CSS Syntax:
selector {
	property: value;
}
Base HTML Coding for a Simple HTML Page w/ CSS
Base HTML:
<!DOCTYPE html>
<html>
<head>
    <meta charset="UTF-8" />
    <title></title>
    <!-- MAIN CSS -->
    <link href="css/style.css" rel="stylesheet" type="text/css">
</head>
<body>
    <h1></h1>
    <h2></h2>
    <h3></h3>
    <h4></h4>
    <p></p>
    <ul>
        <li></li>
    </ul>
    <ol>
        <li></li>
    </ol>
    <a href="#"></a>
</body>
</html>
Base CSS for a Simple HTML Page
CSS Table of Contents (optional):
/* BASE (Initital Setup)
=====================================
	#RESET
	#BASE TYPOGRAPHY
    		#BODY
        	#HEADINGS
        	#PARAGRAPHS
        	#LISTS
        	#LINKS
===================================== */
Simple Reset:
/* #RESET
================================================== */
* {
	margin: 0;
	padding: 0;
}
Base Typography (pixel-based):
/* #BASE TYPOGRAPHY (px-based)
================================================== */

/* #Body */
body {
	font-family: Helvetica, Arial, sans-serif;
	color: #666;
	background-color: #ccc;
	padding: 30px;
	font-size: 14px;
	line-height: 21px;
}

/* HEADINGS
	Based on a Traditional Typographic Scale
    14, 16, 18, 21, 24, 32, 48
*/

h1, h2, h3, h4 {
	margin-bottom: 14px;
}

h1 {
	font-size: 48px;
	line-height: 48px;
}

h2 {
	font-size: 32px;
	line-height: 37px;
}

h3 {
	font-size: 24px;
	line-height: 29px;
}

h4 {
	font-size: 21px;
	line-height: 26px;
}

/* PARAGRAPHS */
p {
	margin-bottom: 14px;
}

/* LISTS */
ul, ol {
	margin-bottom: 14px;
}

ul li, ol li {
	margin-left: 30px;
}

/* LINKS */
a {
	color: #36c;
}
Base Typography (em-based):
/* #BASE TYPOGRAPHY (em-based)
================================================== */

/* BODY */
body {
	font-family: Helvetica, Arial, sans-serif;
	font-size: 100%; /* 1em = 16px */
	line-height: 1.5em; /* 16px x 1.5em = 24px */
	color: #333;
}

/* HEADINGS
	Based on a Traditional Typographic Scale
	48, 36, 24, 21, 18, 16

*/

h1, h2, h3, h4, h5, h6 {
	margin-bottom: .5em;
}

h1 {
	font-size: 3em; /* 48px / 16px = 3em */
	line-height: 1em;
}

h2 {
	font-size: 2.25em; /* 36px / 16px = 2.25em */
	line-height: 1.1em;
}

h3 {
	font-size: 1.5em; /* 24px / 16px = 1.5em */
	line-height: 1.2em;
}

h4 {
	font-size: 1.3125em; /* 21px / 16px = 1.3125em */
	line-height: 1.3em;
}

h5 {
	font-size: 1.125em; /* 18px / 16px = 1.125em */
	line-height: 1.4em;
}

h6 {
	font-size: 1em; /* 16px / 16px = 1em */
	line-height: 1.5em;
}

/* Paragraphs */
p {
	margin-bottom: .5em;
}


/* Lists */

ul, ol {
	margin-bottom: .5em;
}

ul li ul, ul li ol, ol li ul, ol li ol {
	margin: 0;
}

li {
	margin-left: 1.875em;
}

/* Links */
a {
	color: #39c;
}
Lessons:
- Video Lesson
:: Linking a CSS File (Assignment #2) - [url]
Video Download: MP4
Assignment: Due: Week 3
- Post your "HTML page w/ linked CSS file" assignment on your class web page.
- Read about div and section elements, and the difference between block level and inline elements (links are below).
- reading :: w3school.com's div element - [url]
- reading :: htmlhelp.com's div element - [url]
- reading :: w3school.com's html5 section element - [url]
- reading :: wikipedia's difference between block level and inline level elements - [url]
- assignment #2 :: john does's html page with a linked style sheet - [url]
3 Box Model & Block Elements Expand/Collapse
Week 3: This week we will begin Site #1 Company Name 1 by breaking down the common web page into specific sections commonly used for layout, introducing HTML5 tags, Google Shiv/Shim, and more.
Agenda:
- Base
(Version #2) HTML+CSS setup with media queries
- HTML5 shim (aka shiv)
- Media Queries
- Introductions to Site #1: Company Name 1
- Div tests
- Introductions to DIV's as block level elements used for layout
- Normal Flow
- The Box Model
- id's vs. classes
- CSS positioning
Class examples + related links:
Site#1: Company Name 1:
- Company Name 1 - Site Map & Wireframes - [pdf]
- Company Name 1 - Layout & Code Notes - [pdf]
- Company Name 1 - Home Page Design - [jpg]
- Company Name 1 - "About" Sub Page Page Design - [jpg]
- Company Name 1 - Source Design File - [psd]
- Link to Completed Step 1 - [url]
- Link to Completed Step 2 - [url]
- Link to Completed Step 3 - [url]
- Link to Completed Step 4 - [url]
- Link to Completed Step 5 - [url]
- Link to Completed Step 6 - [url]
- Source Code (printout) - Step 1 - [pdf]
- Source Code (printout) - Step 2 - [pdf]
- Source Code (printout) - Step 3 - [pdf]
- Source Code (printout) - Step 4 - [pdf]
- Source Code (printout) - Step 5 - [pdf]
- Source Code (printout) - Step 6 - [pdf]
- Source Code (zipped files) - Step 1 - [zip]
- Source Code (zipped files) - Step 2 - [zip]
- Source Code (zipped files) - Step 3 - [zip]
- Source Code (zipped files) - Step 4 - [zip]
- Source Code (zipped files) - Step 5 - [zip]
- Source Code (zipped files) - Step 6 - [zip]
The Box Model:
- in-class example :: w3's css2 box model page - [url]
- in-class example :: w3's css2 box model page - [gif]
The HTML5 Google Shiv/Shim:
- in-class example :: HTML5 shim - [url]
Div Tests:
- exercise example :: john doe's div test #1 - [url]
- exercise example :: john doe's div test #2 - [url]
- exercise example :: john doe's div test #3 - [url]
HTML Coding: HTML5 backward compatibility support:
Google Shim (aka Shiv):
<!--[if lt IE 9]>
	<script src="https://html5shim.googlecode.com/svn/trunk/html5.js"></script>
<![endif]-->
HTML5 CSS:
/* HTML5 tags */
header, section, footer, aside, nav, article, figure {
	    display: block;
}
Base HTML for a Starting Site
Base HTML:
<!DOCTYPE html>
<html>
<head>
    <meta charset="UTF-8" />
    <title></title>

    <!-- HTML5 -->
    <!--[if lt IE 9]>
    	<script src="https://html5shim.googlecode.com/svn/trunk/html5.js"></script>
    <![endif]-->

    <!-- VIEWPORT FOR MOBILE -->
    <meta name="viewport" content="width=device-width; initial-scale=1">

    <!-- MAIN CSS -->
    <link href="css/style.css" rel="stylesheet" type="text/css">
</head>
<body>
<div class="container">
    <h1></h1>
    <h2></h2>
    <h3></h3>
    <h4></h4>
    <h5></h5>
    <h6></h6>
    <p></p>
    <ul>
        <li></li>
    </ul>
    <ol>
        <li></li>
    </ol>
    <a href="#"></a>
</div>
</body>
</html>
Base CSS for a Starting Site
CSS Table of Contents (optional):
/* BASE (Initital Setup)
=====================================
    #RESET
    #BASE TYPOGRAPHY
        #BODY
        #HEADINGS
        #PARAGRAPHS
        #LISTS
        #LINKS
    #IMAGES
    #CLEARFIX
    #LAYOUT/GRID
    #SITE-SPECIFIC
    	#SECTIONS
    #MEDIA QUERIES
    #@FONT-FACE
===================================== */
Simple Reset:
/* #RESET
================================================== */
* {
	margin: 0;
	padding: 0;
}
HTML5 backward compatibility support:
/* #HTML5
================================================== */
header, section, footer, aside, nav, article, figure {
	    display: block;
}
Base Typography:
/* #BASE TYPOGRAPHY (em-based)
================================================== */

/*
=================================================
	Basic text sizing
=================================================
	Set your main font size for paragraph

	Reference
	62.5%  => 10px
	68.8%  => 11px
	75%    => 12px
	81.3%  => 13px
	87.5%  => 14px
	100%   => 16px (Default)
	112.5% => 18px
	125%   => 20px

*/

/* #Body */
body {
	font-family: Helvetica, Arial, sans-serif;
	font-size: 100%; /* 1em = 16px */
	line-height: 1.5em; /* 16px x 1.5em = 24px */
	color: #333;
}

/* HEADINGS

	Based on a Traditional Typographic Scale
	48, 36, 24, 21, 18, 16

*/

h1, h2, h3, h4, h5, h6 {
	margin-bottom: .5em;
}

h1 {
	font-size: 3em; /* 48px / 16px = 3em */
	line-height: 1em;
}

h2 {
	font-size: 2.25em; /* 36px / 16px = 2.25em */
	line-height: 1.1em;
}

h3 {
	font-size: 1.5em; /* 24px / 16px = 1.5em */
	line-height: 1.2em;
}

h4 {
	font-size: 1.3125em; /* 21px / 16px = 1.3125em */
	line-height: 1.3em;
}

h5 {
	font-size: 1.125em; /* 18px / 16px = 1.125em */
	line-height: 1.4em;
}

h6 {
	font-size: 1em; /* 16px / 16px = 1em */
	line-height: 1.5em;
}


/* #Paragraphs
================================================== */
p {
	margin-bottom: .5em;
}


/* #Links
================================================== */
	a { color: #39c; text-decoration: none; }
	a:visited, a:hover, a:focus { color: #069; }


/* #Lists
================================================== */
ul, ol {
	margin-bottom: .5em;
}

ul li ul, ul li ol, ol li ul, ol li ol {
	margin: 0;
}

li {
	margin-left: 1.875em;
}


/* #Images
================================================== */
img.scale-with-grid {
	max-width: 100%;
	height: auto;
}

a img {
	border: none;
}
/* #CLEARFIX
================================================== */
.group:after {
  content: "";
  display: table;
  clear: both;
}
Layout/Grid styling:
/* LAYOUT/GRID
===================================== */
.container {
	width: 60em; /* 960px / 16px (base) = 60em */
	margin: 0 auto;
}
Commented Areas for site specific and responsive styling:
/* SITE SPECIFIC CSS
===================================== */

/* #Sections (Header, Navigation, Content Sections, Footer) */


/* MEDIA QUERIES
===================================== */
/* Tablet */
@media only screen and (min-width: 48em) and (max-width: 62em) {

}

/* MOBILE */
@media only screen and (max-width: 47.9999em) {

}


/* @FONT-FACE
===================================== */
Example "Base" HTML & CSS files (to download/copy/paste):
See the Pen Base HTML+CSS by kccnma (@kccnma) on CodePen.
Lessons:
- Video
Lesson :: Company Name 1 - Step #1 (Assignment #3) - [url]
Video Download: MP4
Assignment: Due: Week 4
- Startimg with a solid base HTML and CSS setup, begin coding Company Name Site #1 by dividing the page into major sections using semantic HTML5 tags to designate different sections of the site. Then add a small amount of content and use CSS to control the presentation of all sectins and content, such as background color, margin, and padding. Work from the "outside in" and "top down."
- Company Name 1 - Step #1: Basic setup (CN1_v1: DIV sections + em-based typography) - [url]
4 Intro to CSS Positioning & IR Expand/Collapse
Week 4: There are multiple ways to position HTML elements using CSS. This week we will go over some of the popular techniques and best practices, in addition to an intro to two effective image replacement techniques.
Agenda:
- Intro to CSS Positioning
- Floats
- Absolute vs. Relative positioning
- Inserting Images (2 techniques):
- HTML IMG
Tag:
-
<img src="images/myimage.jpg" alt="My Image">
-
- CSS
Background Image:
-
background-image:url('images/myimage.jpg');
-
- HTML IMG
Tag:
- IR Replacement techniques (2 techniques):
- Rundle "Phark" Technique (for non-links)
- Leahy/Langridge Technique (for links)
- Two Helpful Resources/sites to bookmark (with direct links to online articles on Image Replacement):
Lesson:
- IR (Image Replacement):
- What is it?
- A common practice where designers replace HTML text with an image.
- How do you do it?
- There are several techniques – I will show two (the Rundle
"Phark" technique and the Leahy/Langridge Technique - see below)
- These two recommended techniques have been tested to work in all browsers (back to IE6) and are accessible by screen readers.
- Why?
- Aesthetically: to allow designers to use any typeface they want without limited themselves to system fonts or copyright free/royalty free fonts.
- Accessibility: to be able to use images and still make your
site accessible.
- To allow Google and other search engines to be able to parse through and index your site.
- To be Section 508 compliant, allowing handicapped and disabled users to be able to read ALL of the contents of your site, even images.
- The code:
- FOR NON-LINKS: Rundle "Phark" technique
-
text-indent: -9000px;
-
- FOR LINKS: Leahy/Langridge technique (on the "a" element)
-
display: block;
top-padding: [height]px;
height: 0;
overflow: hidden;
-
- FOR NON-LINKS: Rundle "Phark" technique
- There are several techniques – I will show two (the Rundle
"Phark" technique and the Leahy/Langridge Technique - see below)
- What is it?
HTML Coding: Inserting an Image (2 Techniques)
FOR IMAGES AS CONTENT: HTML img Tag:
<img src="images/myimage.jpg" alt="My Image">
FOR IMAGES AS STYLE/UI DESIGN:CSS Background Image
background-image:url('images/myimage.jpg');
HTML Coding: Image Replacement (2 Techniques)
FOR NON-LINKS: Rundle "Phark" technique:
text-indent: -9000px;
FOR LINKS: Leahy/Langridge technique (on the "a" element)
display: block;
top-padding: [height]px;
height: 0;
overflow: hidden;
Slideshow Presentation:
- slide presentation :: week4 - [.pdf]
Class examples + related links:
Helpful Resources:
- in-class example :: a list apart - [url]
- in-class example :: stop design - [url]
- Dave Shea's Mezzo Blue
- Chris Coyier's CSS-Tricks
- in-class example :: w3school's position element - [url]
Assignment-related links:
- Video
Lesson :: Company Name 1 - Step #2 (Assignment #4) - [url]
Video Download: MP4
- assignment #4 :: john does's Company Name 1 - Step #2 w/ two examples of image replacement - [url]
- exercise example :: john doe's div test #4 (positioning) - [url]
Assignment: Due: Week 5
- Continue to Step 2 of coding Company Name 1 by watching the video lesson above. Be sure to work in a new (separate) folder, such as "companyname1_v2."
- Time permitting: conduct a few simple div tests and post them on your class web page.
- Company Name 1 - Step #2: Image Techniques (CN1_v2: Image Replacement) - [url]
5 Unordered Lists for Navigation Expand/Collapse
Week 5: Unordered lists are a semantic way of marking up navigational links for web sites. This week we will learn how to stylize unordered lists using CSS to look like common navigational elements such top and footer navs.
Agenda:
- Intro to Web Fonts and @font-face
- Lesson: How to stylize lists for navigation: how to use lists to make three
different navigation systems:
- A header utility navigation
- A horizontal top navigation
- A footer navigation
- Lesson: a:hover for rollovers
- Using in-line lists for navigation
- use unordered lists
- control the list-style type (set to “none” to remove the default bullet points)
- control the position of the list items via floats or displaying them “inline”
- control the visual formatting using margins, padding and borders
- For further control:
- make a class called “first” or “last”, then take away the border
- Using in-line lists for navigation
Class examples + related links:
@font-face resources:
- @font-face - [url]
- ChunkFive - [url]
- Can I Use .com - [url]
Assignment-related links:
- Video
Lesson :: Company Name 1 - Step #3 (Assignment #5) - [url]
Video Download: MP4
- assignment #5 :: john does's Company Name 1 - Step #3 w/ Nav Lists and @font-face - [url]
Assignment: Due: Week 6
- Continue creating test pages and post them on your class web page.
- Continue to Step 3 of coding Company Name 1 by watching the video lesson above. Be sure to work in a new (separate) folder, such as "companyname1_v3."
- Company Name 1 - Step #3: Navigation w/ Lists (CN1_v3: Navigation w/ Lists + @font-face) - [url]
6 Layout: Columns Expand/Collapse
Week 6: Multiple column layouts can be implemented via CSS using floats. We will also learn @font-face, how to do more advanced CSS rollovers/hovers using sprites, and how to extend the interface background.
! Announcement !
Class on Tuesday is cancelled along with Wednesday office hours. Please check your UH email for additional information and instructions regarding all class assignments and deadlines.
Agenda:
- Web Layout: how to do multiple columns using floats, in stacked sections, in HTML via CSS.
- Brief intro to CSS grid systems.
Class examples + related links:
CSS Grid examples:
- 960 Grid - [url]
- 1140 Grid - [url]
- The Golden Grid - [url]
- Golden Grid System - [url]
- Blueprint - [url]
- Responsive Grid System #1 - [url]
- Responsive Grid System #2 - [url]
- Less Framework - [url]
- 34 Grid - [url]
- Frameless Grid - [url]
- CSS-Tricks.com (Chris Coyier) Article: Don’t Overthink It Grids - [url]
Assignment-related links:
- Video
Lesson :: Company Name 1 - Step #4 (Assignment #6) - [url]
Video Download: MP4
- Company Name 1 - Step #4: Columns (CN1_v4: Columns) - [url]
Assignment: Due: Week 7
- Continue creating test pages and post them on your class web page.
- Continue to Step 4 of coding Company Name 1 by watching the video lesson above. Be sure to work in a new (separate) folder for each step, such as "companyname1_v4."
7 Sprites & Sub Pages Expand/Collapse

Week 7: Continuing coding Company Name site #1 with the goal of continuing the last couple of steps, including image sprites and sub pages.
Agenda:
- How to do CSS rollovers/hovers with image sprites.
- How to create and style sub pages
Assignment-related links:
- Video
Lesson :: Company Name 1 - Step #5 (Assignment #7) - [url]
Video Download: MP4
- Company Name 1 - Step #5: Sprites (CN1_v5: Sprites) - [url]
- Video
Lesson :: Company Name 1 - Step #6 (Assignment #8) - [url]
Video Download: MP4
- Company Name 1 - Step #6: Sub Page (CN1_v6: About Sub Page) - [url]
Assignment: Due: Week 7 & 8
- Continue creating test pages and post them on your class web page.
- Finish Site #1 (Company Name 1) by completing Steps #5 and #6 by watching the video lessons above. Be sure to work in a new (separate) folder for each step, such as "companyname1_v5" and "companyname1_v6."
8 Completed Site Expand/Collapse

Week 8: Continuing coding Company Name site #1 with the goal of continuing the last couple of lessons, including how to create a sub page.
Agenda:
- We will complete unfinished lessons from last week (Company Name 1 through Step #6) during in-class time to complete past and present assignments.
- Time permitting:
- Intro to the Midterm project (Site #2).
- The full Photoshop to HTML/CSS process.
- Bonus Lesson: Search box, social media icons.
- Take advantage of 1-on-1 support in class to ask for help on how to go about coding your midterm site.
Assignment: Due: Week 9
- Finish coding Company Name site #1.
- We will not begin the midterm project (Company Name site #2) until all Company Name site #1 lessons are complete and everyone is caught up.
9 Mid-term Project Expand/Collapse
Week 9: Midterm project begins with an intro and in-class working time, along with continued lessons on HTML & CSS.
Agenda:
- Intro to the Company Name site #2 (mid-term project).
- Home Page Breakdown (identify potential HTML tags & classes)
- The "Big Picture" (coding a robust static site that could potentially be integrated with a CMS like WordPress in the future)
- Establishing a good starting "Base" - a basic setup for a new site from scratch
(starting with an empty folder/directory and creating the initial index.html and
style.css files)
- Content/Markup: adding commonly used HTML to a base HTML file (HTML5 shiv, h1-h6 tags, paragraphs, lists, links, blockquotes, etc).
- Style/Presentation: adding commonly used CSS to a base CSS file (reset, html5, base typography, clearfix, etc) and adding commented sections for eventual grid/layout, custom site-specific styling, & media queries)
- Full work week to work on Company Name site #2, which is due in two weeks.
- Take advantage of 1-on-1 support in class to ask for help fixing bugs.
Base HTML for a Starting Site
Base HTML:
<!DOCTYPE html>
<html>
<head>
    <meta charset="UTF-8" />
    <title></title>

    <!-- HTML5 -->
    <!--[if lt IE 9]>
    	<script src="https://html5shim.googlecode.com/svn/trunk/html5.js"></script>
    <![endif]-->

    <!-- VIEWPORT FOR MOBILE -->
    <meta name="viewport" content="width=device-width; initial-scale=1">

    <!-- MAIN CSS -->
    <link href="css/style.css" rel="stylesheet" type="text/css">
</head>
<body>
<div class="container">
    <h1></h1>
    <h2></h2>
    <h3></h3>
    <h4></h4>
    <h5></h5>
    <h6></h6>
    <p></p>
    <ul>
        <li></li>
    </ul>
    <ol>
        <li></li>
    </ol>
    <a href="#"></a>
</div>
</body>
</html>
Base CSS for a Starting Site
CSS Table of Contents (optional):
/* CSS TABLE OF CONTENTS
=====================================
	#BASE CSS
	#SITE-SPECIFIC CSS
===================================== */

/* BASE (Initital Setup)
=====================================
	#RESET
	#HTML5
	#BASE TYPOGRAPHY
		#BODY
		#HEADINGS
		#PARAGRAPHS
		#LINKS
		#LISTS
	#IMAGES
	#CLEARFIX
===================================== */
Simple Reset:
/* #RESET
================================================== */
* {
	margin: 0;
	padding: 0;
}
HTML5 backward compatibility support:
/* #HTML5
================================================== */
header, section, footer, aside, nav, article, figure {
	    display: block;
}
Base Typography:
/* #BASE TYPOGRAPHY (em-based)
================================================== */

/*
=================================================
	Basic text sizing
=================================================
	Set your main font size for paragraph

	Reference
	62.5%  => 10px
	68.8%  => 11px
	75%    => 12px
	81.3%  => 13px
	87.5%  => 14px
	100%   => 16px (Default)
	112.5% => 18px
	125%   => 20px

*/

/* #BODY */
body {
	font-family: Helvetica, Arial, sans-serif;
	font-size: 100%; /* 1em = 16px */
	line-height: 1.5em; /* 16px x 1.5em = 24px */
	color: #333;
}


/* #HEADINGS

	Based on a Traditional Typographic Scale
	48, 36, 24, 21, 18, 16

*/

h1, h2, h3, h4, h5, h6 {
	margin-bottom: .5em;
}

h1 {
	font-size: 3em; /* 48px / 16px = 3em */
	line-height: 1em;
}

h2 {
	font-size: 2.25em; /* 36px / 16px = 2.25em */
	line-height: 1.1em;
}

h3 {
	font-size: 1.5em; /* 24px / 16px = 1.5em */
	line-height: 1.2em;
}

h4 {
	font-size: 1.3125em; /* 21px / 16px = 1.3125em */
	line-height: 1.3em;
}

h5 {
	font-size: 1.125em; /* 18px / 16px = 1.125em */
	line-height: 1.4em;
}

h6 {
	font-size: 1em; /* 16px / 16px = 1em */
	line-height: 1.5em;
}


/* #PARAGRAPHS
================================================== */
p {
	margin-bottom: .5em;
}


/* #LINKS
================================================== */
	a { color: #39c; text-decoration: none; }
	a:visited, a:hover, a:focus { color: #069; }


/* #LISTS
================================================== */
ul, ol {
	margin-bottom: .5em;
}

ul li ul, ul li ol, ol li ul, ol li ol {
	margin: 0;
}

li {
	margin-left: 1.875em;
}
Responsive Images:
/* #IMAGES
================================================== */
img.scale-with-grid {
	max-width: 100%;
	height: auto;
}

a img {
	border: none;
}
Clearfix:
/* #CLEARFIX
================================================== */
.group:after {
  content: "";
  display: table;
  clear: both;
}
Commented Areas for site specific and responsive styling:
/* SITE-SPECIFIC CSS (Site-Specific Design)
=====================================
	#SITE-SPECIFIC GENERAL STYLING
	#SITE-SPECIFIC TYPOGRAPHY
	#LAYOUT/GRID
	#SECTIONS
	#MEDIA QUERIES
	#@FONT-FACE
===================================== */

/* #LAYOUT/GRID */
.container {
	/* Fixed width: 960px */
    width: 50em; /* 960px / 16px (base) = 60em - padding = 50em */
	margin: 2em auto;
	padding: 5em;
	background: #fff;
}


/* MEDIA QUERIES
===================================== */
/* Tablet */
@media only screen and (min-width: 48em) and (max-width: 62em) {

}

/* MOBILE */
@media only screen and (max-width: 47.9999em) {

}


/* @FONT-FACE
===================================== */
Example "Base" HTML & CSS files (to download/copy/paste):
See the Pen Base HTML+CSS by kccnma (@kccnma) on CodePen.
Presentation:
- Video Lesson :: Setting up a Base HTML+CSS Start for Site #2
- [url]
Video Download: MP4
Assignment: Midterm Company Name #2 SiteDue: Week 11
- Begin coding your midterm web site. Do as much as you can, working outside-in, top-down.
- Use this layout pdf as a guide to help you establish your markup.
- Make sure that all content is formatted well. Pay attention to the negative space (ie. margins, padding, etc.)
- Final Project Tasks:
- For your final project, if you are coding your design from ART 229, please post your ART 229 designs as jpgs on your class web page. For those who are not in ART 229, please speak to me about what you will be coding for the final project. Once approved, please post a link to your designs.
- Once your final project designs are posted, go to our class work site on Laulima. In the Discussions area, add your name and the title of your final project as a "new topic" inside of the "Final Project" forum (just like how John Doe did) - then post a direct link to your final project design(s) (jpgs posted on your web site). In this discussion area we can provide feedback for final revisions before you begin coding.
10 Mid-term Project Expand/Collapse
Week 10: Midterm project continues with in-class working time, along with continued lessons on HTML & CSS.
Agenda:
- Mini lesson on HTML forms (using a seach box as an example).
- Work week to code the midterm project.
- Please note that the Photoshop file has been updated to Version 1.1.
- Sub Pages were added (About Page, Products Listing Page, Product Details Page, Contact Page).
- Minor Typography Changes.
- Added a main nav selected state.
- Do your best to try to complete the home page and as many sub pages as you can.
- Please note that the Photoshop file has been updated to Version 1.1.
- Take advantage of 1-on-1 support in class to ask for help fixing bugs.
Mini Lesson:
Search input forms
- W3: Forms Page
- W3 Schools: Form tag
- W3 Schools: Input tag
- W3 Schools: Label tag
- OSU WAC: Hiding Labels Page
- John Doe's Search Test
Resources:
Frameworks
Icon Sets
Grids
- 960 Grid
- Responsive Grid System
- Chris Coyier's Don't Overthink It Grids Article
- Skeleton's Simplified & Responsive Base 960 Grid (16 Column)
- Skeleton's Responsive 960 Grid (12 Column)
Assignment: Midterm Company Name #2 SiteDue: Week 10
- Continue coding your Midterm Company Name #2 web site. Do as much as you can, working outside-in, top-down.
- Final Project Tasks:
- For your final project, if you are coding your design from ART 229, please post your ART 229 designs as jpgs on your class web page. For those who are not in ART 229, please speak to me about what you will be coding for the final project. Once approved, please post a link to your designs.
- Once your final project designs are posted, go to our class work site on Laulima. In the Discussions area, add your name and the title of your final project as a "new topic" inside of the "Final Project" forum (just like how John Doe did) - then post a direct link to your final project design(s) (jpgs posted on your web site). In this discussion area we can provide feedback for final revisions before you begin coding.
11 Spring Break Expand/Collapse

Week 11: Spring Break. No class this week due to the break. Use this week off to relax, take care of yourself, play catchup, or continue working on your final project. Be sure to backup all of your work to date.
Agenda:
- ----- [ NO CLASS - SPRING BREAK ] -----
Assignment: FINAL HTML/CSS Coded Web SiteDue: Week 17
- There is no homework over break, but please consider the following:
- Take advantage of the break to complete any and all past assignments (ie. Site #1 and Site #2).
- Take advantage of the break to make any further changes to your site #3 design that you will be coding for the final project.
- If your design is in good shape, you can begin coding it - as a "test" document. Keep in mind, that you may need to code several "test" html pages (ie. for the home page alone) - so be prepared to start over from scratch multiple times.
12 Mid-term Critique Expand/Collapse

Week 12: Midterm critique. We will also talk about the final project and take a look at the designs you will be coding.
Agenda:
- Midterm critique:
- 5-10 minutes per person to present.
- Tone will be informal (anecdotal).
- Order will be determined via signup on the whiteboard at the beginning of class.
Assignment: Coded Home PageDue: Week 14
- Aim to have a fully coded home page over the next two weeks.
Assignment: FINAL HTML/CSS Coded Web SiteDue: Week 17
- Begin coding your web site. Your goal is to have a well coded home page before moving on to the sub pages.
- If your home page is complete, be sure to test it on all browsers and both platforms before moving ahead to the sub pages. Don't forget PC IE (IE 8+).
13 Final Project Expand/Collapse

Week 13: Final Project officially begins. Start by coding your home page working outside in, top down.
Agenda:
- Full Intro/Overview of the Final project.
- In-class working time. Be sure to take advantage of in-class 1-1 support.
- Informal Midterm Critique/discussion on Thursday.
Lessons: Brief Intro to Javascript, JQuery, Show/Hide Layers, & CSS Drop-down/Fly-out Menus.
Class examples + related links:
Javascript related:
- Conducting Tests - [url]
- JQuery.com - [url]
- Learn JQuery - [url]
- How JQuery works - [url]
- Jquery.com's JavaScript 101 - [url]
- W3School's JavaScript Home - [url]
- lesson example :: john doe's show/hide layer test #1 - [url]
- lesson example :: john doe's show/hide layer test #2 - [url]
- javascript file: showhide.js - [.js]
- lesson example :: john doe's jquery show/hide layer test #1 - [url]
- javascript file: jquery.js - [.js]
- javascript file: jquery_showHide.js - [.js]
- in-class exercise: All Three Show Hide Tests - [.zip]
Drop-down/fly-out related:
- in-class example: Suckerfish Dropdowns - [url]
- in-class example: Sons of Suckerfish Dropdowns - [url]
- Example #1: Main Nav without Drop Down Menu - [url]
- Example #1: Main Nav with Drop Down Menu - [url]
- Example #2: Main Nav w/ Image Rollovers - [url]
- Example #2: Main Nav w/ Image Rollovers and Drop Down Menu - [url]
- Example #3: Drop Down Menu in context on a full page - [url]
- javascript file: dropdown.js - [.js]
Assignment: Coded Home PageDue: Week 14
- Aim to have a fully coded home page for next week.
Assignment: FINAL HTML/CSS Coded Web SiteDue: Week 17
- Begin coding your web site. Your goal is to have a well coded home page before moving on to the sub page template.
- If your home page is complete, be sure to test it on all browsers and both platforms before moving ahead to the sub page template. Don't forget PC IE (IE 8+).
14 Final Project Expand/Collapse

Week 14: In-class work week. Continue coding your home page working outside in, top down. Only when your site is tested, validated, and bug-free can you move on to your sub page.
Agenda:
- In-class review of home page code.
- In-class working time to continue coding your site. Be sure to take advantage of in-class 1-1 support.
- Lessons: LightBox/Modal Boxes, Brief overview of HTML tables and their history as a layout technique
Class examples + related links:
- Smashing Magazine Article :: Modal Windows In Modern Web Design - [url]
- FancyBox 2 - [url]
- Lightbox 2.0 - [url]
- John Doe's Lightbox 2.0 Example - [url]
- article :: throwing tables out the window by douglas bowman - [url]
- presentation :: throwing tables out the window by douglas bowman - [url]
- lesson example :: john doe's table-based layout - [url]
- lesson example :: john doe's css-based layout - [url]
- lesson example :: tables for data - [url]
Assignment: FINAL HTML/CSS Coded Web SiteDue: Week 17
- Continue coding your web site. By now you should have a solid home page coded. If not, continue (re)coding it until it is solid, stable, robust, and tested to work on multiple platforms and browsers. Once you are done with the home page, you can go ahead and work on your sub pages and begin to add in content.
- Be sure to test your site on all browsers and both platforms before moving ahead to the sub page template. Don't forget PC IE (IE 8+).
15 Final Project Expand/Collapse

Week 15: In-class work week. Continue coding your sub pages starting with a template originating from a solid home page.
Agenda:
- Work week & informal QA test week. Be sure to take advantage of in-class 1-1
support.
- Use the QA Bug Tracking Sheet to help log, organize, and prioritize your remaining bugs.
- Mini-lessons: Faux columns, Classes & ID's, Anchors, Styling forms, and transparency.
Class examples + related links:
- in-class example :: faux columns test
- in-class example :: css-tricks.com - [url]
- in-class example :: difference between classes and id's - [url]
- lesson example :: anchors to id's - [url]
- lesson example :: animated anchors to id's - [url]
- lesson example :: forms - [url]
- in-class example :: w3schools's html form page - [url]
- in-class example :: 456bereastreet.com's styling forms article - [url]
- in-class example :: ALA's styling forms article - [url]
- lesson example :: transparent bg images #1 - [url]
- lesson example :: transparent bg images #2 - [url]
Assignment: FINAL HTML/CSS Coded Web SiteDue: Week 17
- Continue coding your web site. By now you should be have a working 1st draft and have begun entering your content.
- Be sure to test your site on all browsers and both platforms before entering in final content. Don't forget PC IE (IE 8+).
16 Final Project Expand/Collapse

Week 16: QA Test Day. Your coded site should be complete, ready to be tested on multiple browsers and platforms.
Agenda:
- Official QA (Quality Assurance) Test Day to test your site on all browsers and
platforms.
- Use the QA Bug Tracking Sheet to help log, organize, and prioritize your remaining bugs.
- Full work week. Be sure to take advantage of in-class 1-1 support.
- Announcements:
- Please fill out the online eCafe student course evaluation form.
- The final project is due next week.
- After the critique, any revisions to the final project will be due by the following Tuesday after the final critique.
Class examples + related links:
- QA Bug Tracking Sheet - [.xls]
Assignment: FINAL HTML/CSS Coded Web SiteDue: Week 17
- If you haven't done so already, start a list of all of your outstanding bugs to date. Prioritize your bugs starting with the critical bugs as the most important to be placed on the top of your task list.
- Fix ALL of your bugs and continue testing your site.
- Be sure to validate your site and test it on PC IE (IE 8+).
- If you are finished with your site, ask yourself, "what can I do to make it better?"
17 Final Critique Expand/Collapse

Week 17: Final critique. All final project deliverables are due this week.
Agenda:
- Final critique on Thursday May 8th, 8am-1pm.
- 10 minutes per person to present.
- Order will be determined via signup on the whiteboard on Monday at 8:00am.
- Further feedback should be provided for your peers via Laulima under each persons's final project discussion area.
- Announcements:
- After the critique, any revisions to the final project are due by next week Monday.
Critique Schedule:
| Student | Time |
|---|---|
| ----- SETUP ----- | 8:00-8:10 |
| #1 | 8:15-8:25 |
| #2 | 8:30-8:40 |
| #3 | 8:45-8:55 |
| #4 | 9:00-9:10 |
| #5 | 9:15-9:25 |
| ----- 10 Min. BREAK ----- | 9:30-9:40 |
| #6 | 9:45-9:55 |
| #7 | 10:00-10:10 |
| #8 | 10:15-10:25 |
| #9 | 10:30-10:40 |
| #10 | 10:45-10:55 |
| ----- 10 Min. BREAK ----- | 11:00-11:10 |
| #11 | 11:15-11:25 |
| #12 | 11:30-11:40 |
| #13 | 11:45-11:55 |
| #14 | 12:00-12:10 |
| #15 | 12:15-12:25 |
| ----- CLOSING REMARKS ----- | 12:30-1:00 |
X EXTRA BONUS MINI LESSONS Expand/Collapse

BONUS: Here are a few Extra Bonus Mini Lessons for your future reference.
Extra Bonus Lessons:
- Grid Tests:
- Company Name 1 Related:
- Company Name #1 - Responsive (Using Media Queries)
- Company Name #1 - Responsive w/ a Grid (A Skeleton adapted 960 Grid w/ 16 Columns)
- Jquery related:
- JQuery Single Vertical Page - (with animated anchors)
Quotes
Random quotes that are relavent to this class
"Web standards are the tools with which all of us can design and build sophisticated, beautiful sites that will work as well tomorrow as they do today."
Jeffrey Zeldman, Best-selling author, designer, and web standards evangelist.
From the book Desinging With Web Standards.